2.4 Flex track
Most track programs have one or more flexible track articles. In TRAX flex tracks can be used in three ways: as a custom curve, as a custom length straight and as free-to-form track.
1: The custom curve
Create your own curve with a given radius and angle. On the track tab, you will find the custom curve button:
![]()
Before you click it, set the radius and angle you need in the input controls next to it. Then click it to create the curve. You can click the button more than once to make multiple curves.
2: Custom length straight
On the track tab, you find the custom straight button:
![]()
First set the length than click on the button.
3: Free form
You can also form the flextrack using the mouse. First, add it to your layout as you would add other tracks: append it to an existing track or place it anywhere you like.
Now you can form the flex track by dragging the dots. The flex track will curve nicely between the two ends.
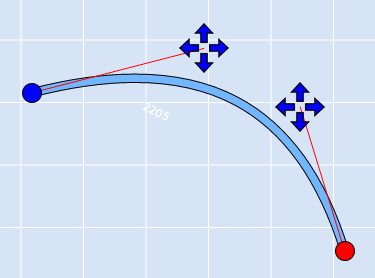
If you need to modify the way the flex track curves, double click on it and two new handles will appear:

These handles are the controls used to form the curve. A red line that runs from the handle and the end of the track, indicates the angle at that end of the track. Move the handles around to change the curve. When the corresponding end of the track is attached to another track, you can not change the direction, when it is not the direction can also be changed.
Read more in 2.6 Advanced track planning
A fourth type...
When calculating parallel tracks, TRAX will use flex tracks whenever it can't find the right sectional track. When TRAX automatically inserts flex tracks, it will set a fixed path that you cannot alter.


